Wednesday, December 13, 2006

Plate Tectonics: An Introduction

Continental Drift and the Structure of the Earth


Image courtesy of USGS


Our next unit is the study of plate tectonics. In this unit we will be studying the forces of nature which have shaped our planet including the processes behind natural hazards such as earthquakes and volcanoes. We will also be considering the impact that such hazards have on people across the world. It is believed that out continents have not always been in their present configuration and that over millions of years our continents have changed their position (see animation). This theory is known as continental drift.

Millions of years ago there was one supercontinent called Pangea. Over time this has split into smaller continents which have gradually moved into the positions in which they exist today. There are various pieces of evidence for this including the apparent jigsaw fit between the east coast of South America and the west coast of Africa.

In order to understand how this is possible we need to consider the structure of the earth.


The earth is up to 6,000km in radius from the inner core to the surface. It is made up of four main layers. The surface layer is known as the crust. This is the relatively thin layer on which we live and it consists of solid rock. The crust 'floats' on top of the mantle. The mantle has very high temperatures resulting in rock being in a 'molten' state. This 'molten' rock is known as magma and is able to move. At the centre of the earth is the core. This is divided into the outer and the inner core. The outer core is partly molten whilst the inner core is solid, this is due to the extreme temperature and pressures which exist here, with temperatures reaching up to 5,000 oC.


Follow up Links:
Some useful and clear animations showing the movement of the continents over millions of years in the process of continental drift can be found here:
- The 'fit of the continents' (evidence for continents having moved)

Check out this excellent site for more information about the structure of the earth and its layers. Further detail on the structure can be found here.

Key Terms Check:


Continental Drift - the theory that our continents have changed their postion over time
Crust
- the outer layer of the earth (up to 75km thick)
Mantle - the middle and thickest layer of the earth part of which is semi-molten in nature
Outer Core - the outer layer of the core is semi-molten
Inner Core - central part of the earth which is solid due to extreme temperature and pressure
Magma - molten rock in the mantle

Sunday, December 03, 2006

Rivers Revision

Revising the Rivers Unit
We have now come to the end of the Rivers Unit and its time to revise! Here are some resources to help you..

Check list of key concepts to revise:

  1. Hydrological Cycle - key terms (and understanding of inputs, stores & processes)
  2. Drainage Basin - remember this is the land based part of the Hydrological Cycle - learn the key terms (both of drainage basin features e.g. source, watershed etc. and processes e.g. throughflow) and their meanings and be able to distinguish between inputs, stores, processes & outputs
  3. River Processes - erosion, transport and deposition (Learn them!)
  4. The course of a river - you should know the main changes in both river channel and valley as it passes from source to mouth
  5. River Features:- (remember you need to be able to describe and explain the characteristics / formation of each - remember to talk about processes involved) - these include...
  6. Upper Course of the River - v-shaped valleys and waterfalls
  7. Middle Course of the River - meanders and ox-bow lakes
  8. Lower Course of the River - floodplains and levees
  9. Hydrographs - hydrograph features and terms (lag time, discharge, peak rainfall, peak discharge, rising limb, falling limb) and factors affecting hydrographs (e.g. land-use, basin shape etc.)
  10. Case study of Flooding in an MEDC - Lynmouth 1952
  11. Case study of Flooding in an LEDC - Bangladesh 1998 floods
  12. Contrasting flooding between MEDCs and LEDCs (reasons for differences)
Revision Resources:
  • - make good use of your class notes
  • - make use of the blog posts to consolidate your understanding / go over anything you are not sure on (to access previous posts - use blog archive list on the left hand side of the blog) - remember there are various links to animations etc. to help you!
Interactive Revision Quizzes:
You must learn your notes (particularly case study detail) but once you have revised from your notes there are lots of interactive revision quizzes etc. here for you to test yourself! (if you spot any mistake - e-mail me!)

Comparing flooding in MEDCs and LEDCs

Comparing the effects of flooding in MEDCs and LEDCs

Having studied two flood case studies in countries with contrasting levels of economic development you will have seen that MEDCs usually have much better flood protection than LEDCs and subsequently the effects of flooding are often not as severe in terms of loss of life. However flooding still occurs in MEDCs and as well as some loss of life, the level of economic disruption can still be significant. You need to be aware of the main reasons for the differences in the level of disruption caused by flooding in LEDCs and MEDCs:

Problems faced in LEDCs which make the effects of flooding worse and flood management difficult:

  • - poor quality housing can't withstand flood waters
  • - poor infrastructure is easily damaged with roads, bridges and communications destroyed by flooding
  • - lack of sanitation and clean water supplies resulting in further loss of life during floods through the spread of diseases such as cholera, dysentery etc.
  • - difficult to mobilise rescue teams - lack of funding for training but made more difficult by many areas being isolated during flooding due to damage to infrastucture and inundated by flood waters;
  • - little political co-operation between Bangladesh and its neighbouring countries - makes it difficult to reduce flood risks by tackling issues in the headwaters of the major rivers which are located in India and Nepal;
  • - the country relies on government aid and aid from other countries - with a lack of money many necessary flood defences can not be constructed
  • - in order to tackle poverty the government have focused much of their funds on improving exports - again reducing the money available for flood protection.
Reasons why the effects of flooding usually less severe in MEDCs and flood protection is better:
  • - homes and possessions are able to be insured against flood damage
  • - good water and sewage systems are in place providing back up supplies of clean water when local supplies become contaminated - means that disease is not the problem it is during flooding in LEDCs;
  • - good infrastructure and communication networks means it is easier to get aid and helpworkers to affected areas increasing survival through rescues and evacuation;
  • - planning restrictions are usually in place to discourage new building of houses on floodplain areas or areas prone to flooding;
  • - governments in MEDCs are able to invest more heavily in flood defence systems - including channelisation projects; the construction of artifical levees and the development of prediction and warning systems.
You should be prepared in an exam to be able to contrast the effects of flooding in MEDCs and LEDCs and to be able to suggest reasons for the differences.

Flooding in an LEDC - The 1998 Floods in Bangladesh

BANGLADESH FLOODS

Between July-September 1998, Bangladesh suffered one of its worse ever floods. Despite being flooding being common in this country, the floods of 1998 were particularly severe resulting in over 1000 deaths and 30 million people being made homeless and newspapers / media sources were full of headlines like the following; South Asia - Bangladesh Floods Rise again (BBC Article) and Floods threaten 20 million lives in Bangladesh.

So why is Bangladesh so prone to flooding? Well the answer to this requires consideration of both the physical landscape and conditions of the country and the impact of its population.

CAUSES OF FLOODING IN BANGLADESH

Physical (Natural) causes of flooding in Bangladesh
  1. Bangladesh is a very low lying country, with 70% of its land area being less than 1m above sea level and 80% of it being floodplain.
  2. Bangladesh receives large amounts of water passing through it with two major rivers (the Ganges and Brahmaputra) converging and forming a huge delta (see picture) formed from silt deposited by the river as it enters the sea. Both rivers have large volumes of water flowing through them to the sea as they have large drainage basins which increasing the flood risk;
  3. Bangladesh has a monsoon climate and the annual torrential rains which result often result in the rivers exceeding their capacity and flooding;
  4. In the spring, melting snow from the Himalayas further increases the flood risks as torrents of melt water enter the rivers at their source.
Human causes of flooding in Bangladesh
  1. Increasing population pressure in the foothills of the Himalayas where the rain contributes to the source of the River Ganges and Brahmaputra has resulted in intense deforestation. It is believed that this reduction in interception has resulted in more water entering the rivers - indeed with 92% of the area drained by the rivers being in countries other than Bangladesh, Bangladesh's proneness to flooding is exacerbated by population and environmental issues in countries other than its own, making it increasingly difficult to target the problems.
  2. Indeed deforestation in the headwaters is also believed to be responsible for the increased soil erosion which has led to large amount of silt being washed into the rivers and subsequently being deposited on the river bed, reducing its channel capacity and increasing the likelihood of flooding.
  3. Increasing population pressure in Bangladesh itself has resulted in the sinking of many new wells resulting in the lowering of the water table and the subsequent subsidence of land making it even more prone to flooding;
  4. Bangladesh is an LEDC and its lack of money and heavy national debt means that little money is available to spend on flood protection methods / defences and many existing defences lack upkeep and are of questionable use.
(click on the digram below for a summary of these)


EFFECTS OF FLOODING IN BANGLADESH

Remember - you must learn place specific detail when writing answers to case study questions if you are to be awarded the full marks.

POSITIVE EFFECTS OF FLOODING

It is important to remember that whilst flooding has serious impacts on human life in Bangladesh it is also instrumental in the wellbeing of Bangladesh's economy and the survival of its people. So what are these positive effects of flooding?
  1. As well as providing water for crops, when flooding occurs, as there is friction between the water and the surface of the land, the water slows down and loses its energy. This loss of energy results in the deposition of rich fertile soil resulting in the providing important nutrients enabling people to grow crops;
  2. This deposition of silt also creates land upon which people can live - for example the Ganges delta has been formed in this way as deposition has occured where the river has entered the Bay of Bengal.
EFFECTS OF THE 1998 FLOODS:
  1. Over two thirds of the land area was covered by water and the capital, Dhaka, was 2m underwater.
  2. 30 million people were made homeless in the floods with many losing all their belongings.
  3. 1,070 people died - this death toll resulted from a number of things. As well as people being killed by drowning in the flood waters, health problems increased the number of deaths further. Contamination of water by waste and dead bodies / animals, and the lack of a clean water supply resulted in the spread of disease such as cholera and typhoid. Further deaths from snake bites and other injuries which led to death through the lack of access to medical care.
  4. Food supplies were severely affected as flooding destroyed the rice stocks with a total of 668,529ha of crops being destroyed;
  5. The impact on the economy was signifcant with Bangadesh's export industries seeing a 20% decrease in production with over 400 clothing factories forced to close.
  6. Communications became difficult, with shopping impossible in the main port, as well as roads and railways having been swept away making the distribution of aid and the rescue operation very difficult;
The effects can clearly be seen in the following links:
Photographic presentation of the floods of 1998
Flood '98 - Bangladesh Photo Gallery

and all though very detailed this report provides an over view of the Disaster Impacts, Household coping and response. This chapter from the report provides specific detail on the impacts of the flood on agricultural production, employment and wealth.

FLOOD RELIEF / MANAGEMENT IN BANGLADESH

As has already been mentioned Bangladesh's low level of economic development means Bangladesh's flood protection is insufficent and a number of factors as discussed in this post have exacerbated the problems.

Following the 1998 floods a number of short term flood relief measures were put in place to try an minimise loss of life - these included:
  • international food aid programmes
  • the distribution of free seed to farmers by the Bangladesh govenrment to try and reduce the impact of food shortages - the government also gave 350,000 tonnes of cereal to feed people;
  • volunteers / aid workers worked to try and repair flood damage (see OCR A textbook - p.39 for further details)
In the long term a number of flood prevention measure are possible:
  • the creation of embankments (artificial levees) along the river to increase channel capacity and restrict flood waters - however since 1957, 7,500km of flood embankments have been constructed and yet many were breached in the 1998 floods;
  • constructing flood protection shelters (large buildings raised above the ground) to shelter both people and animals
  • emergency flood warning systems and plans made for organising rescue and relief services;
  • providing emergency medical stores in villages
  • building flood proof storage sheds for grain and other food supplies
  • dam construction upstream and major embankments around Dhaka have been suggested however lack of money has meant that these suggestions have not been taken further.
Further Links:

Conclusions and lessons from the 1998 floods
Lessons learning from the 1998 Bangladesh Floods
Map source: US CIA World Factbook (Creative Commons)
Photo source: Ganges delta - screenshot from NASA World Wind (Creative Commons)

Flooding in an MEDC - The 2004 Boscastle Flood

The Boscastle Floods of 2004

Flash floods such as those that resulted in the flooding Lynmouth back in 1952 are often caused by a combination of factors which as well as sustained heavy rainfall, includes consideration of the relief and drainage of an area. In 2004, almost exactly 52 years to the day after Lynmouth's disaster, Boscastle, a town in north Cornwall suffered a fate simillar to that of Lynmouth as 6cm of rain fell in two hours resulting in a 3m high wall of water rushing through the village. This BBC newspaper article summaries the causes of the Boscastle flood - look for similarities in the cause between this flood and the one you have studied that affected Lynmouth in 1952.

The village of Boscastle suffered extensive damage after the flood and the Environment Agency have released this excellent (but detailed) document summarising the causes, effects and responses to the Boscastle flood entitled "
living with the risk".

6 buildings and many cars were washed into the sea and boats and other debris was washed into the sea. Thankfully unlike Lynmouth, in the Boscastle floods there were no major injuries or loss of life - even more amazing when you see the pictures and video footage of the devastation caused. If you are interested in finding out more the following links provide further information on the causes and effects of the Boscastle flood - there are also some great pictures and short video clips showing the devastation.

Articles
North Cornwall Flooding Updates - provides a useful summary of day by day updates from the time of the flood
Wikipedia Article - Boscastle Flood 2004
Boscastle a 'tourist ghost town' (BBC Article)
Devastation in Boscastle (BBC Cornwall) - great site including audio file interviews with villagers
Villagers describe flood horror (BBC article)
Dozens rescued from flash floods (BBC article)
Village 'unlikely to flood again' (BBC article)

Photo Galleries
In Pictures - Then and Now (Boscastle Flood) (BBC) - excellent site showing very clear photographs of the devasted areas before and after the floods;
The devastation and clean up operation (BBC)
Repair work being undertaken in Boscastle
Photographs of the 2004 Boscastle Flood


Video Reports on the flooding
BBC 2004 video report on the Boscastle Floods (see top side link)
BBC video report on Boscastle as it is now (see bottom video link)

Mr Allway of geographyalltheway.com has added an excellent activity to his website comparing the Boscastle and Lynmouth floods - well worth a look!

Source of Photographs: Wikipedia Creative Commons - Benjamin Evans

Flooding in an MEDC - The 1952 Lynmouth Flood

LYNMOUTH FLOOD 1952 (Devon)

The Lynmouth Flood
It happened in August of 1952,
The size of the river suddenly grew;
It tossed and turned and ruined lives,
It killed husbands, children and wives;
The sun disappeared, they sky turned grey;
This was no longer an ordinary day.
The water rose to 40ft high,
You could here all around the people cry.
In the months before there had been lots of rain,
The ground no longer became a drain.
The ground trembled, water came crashing,
Parents were runnning, children were splashing;
When the water came in there was no place to, hide
The river was loud, fast and wide;
It came thundering in and over took the land,
Destroying houses like a giant's hand. (Chloe - Yr 8)


The flood which hit the Devon village of Lynmouth on August 15th 1952 was one of the worst in living memory in Britain. This BBC article from the time gives an introduction to the disaster. Floods the size of that which struck Lynmouth may occur only every 100 - 200 years. For your exam you will need to know the causes of the floods and the effects on the people, environment and economy of Lynmouth.


CAUSES OF THE LYNMOUTH FLOOD


So what did cause the River Lyn following through Lynmouth to burst its banks in such a devasting way in August 1952? The answer to this question involves consideration of several contributing factors which had increased the likelihood of such a flood taking place (click on diagram for a summary of the factors).
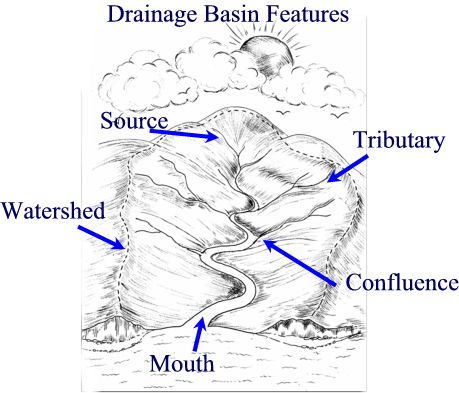
  • The small but steep sided drainage basin in which Lynmouth was situated increased the risk of flooding in the area. The steep sides encouraged greater surface runoff and combined with the small drainage basin size meant any water could reach the river fairly quickly;
  • This was made worse by the high drainage density of the area due to the impermeable rocks of the area around Exmoor which formed the source of the river; again increasing the amount of surface runoff following rainfall;
  • Prior to August 15th 1952 Lynmouth had received above average rainfall for 12 out of the first 14 days of the month meaning the soils were already saturated and the river levels high.
  • On August 15th a heavy thunderstorm resulted in 200mm falling in 14 hours, one of the three heaviest rainfalls recorded in the UK. This heavy rain combined with the saturated ground and rapid surface runoff resulted in a huge volume of water flowing down the river. As Lynmouth is situated at the confluence of the East and West Lyn rivers the volume of water was increased further at this point and the was far beyond the capacity of the river channel causing the river to burst its banks. This resulted in devastating floods as the West Lyn which had been diverted during the construction of parts of Lynmouth retook its natural course, flowing straight through the village.
EFFECTS OF THE LYNMOUTH FLOOD

You will need to make sure you learn place specific facts about both causes and effects in order to achieve the full marks in case study questions - here are a list of some of the effects of the Lynmouth Flood:
  • Debris built up behind bridges resulting in the build up of a flow of water which eventually burst resulting in torrents of water flowing through Lynmouth with 34 people being killed in the disaster
  • The West Lyn river took its original course flowing straight through Lynmouth destroying 90 houses and hotels;
  • 130 cars and 19 boats were also lost, swept into the river or out to sea as the force of water was able to transport large amounts of debris (including gigantic boulders)
  • Debris transported by the River Lyn resulted in the enlargement of the River Delta
This link to audio clips features interviews with some survivors of the Lynmouth Flood

Flood Management

Following the Lynmouth flood disaster, flood management plans were put in place to try and ensure such a disaster could not happen again by managing any excess rain water so that the River could cope in the future.


A number of flood management strategies were put in place:
  1. The mouth of the East Lyn was widened to increase capacity and allow water to quickly pass into the Bristol Channel
  2. The West Lyn was straightened to increase channel efficiency - straightening the channel reduces friction and increases velocity, enabling water to travel through the channel as quickly as possible making it more efficient in coping with flood waters;
  3. The West Lyn was not rediverted, instead being allowed to follow its natural course
  4. Floodplain zoning was used to identify areas around the river most at risk from flooding. Building restrictions were then put in place with areas close to the river which are most prone to flooding being left as open spaces such as car parks.
  5. Bridges were made wider and taller to allow flood water to tr avel quickly beneath them and to reduce the likelihood of debris becoming trapped and acting like a dam as had happened in 1952;
  6. Embankments were built by the river to increase channel capacity and reduce the likelihood of flooding;
  7. More trees were planted upstream in the source area to try and reduce initial surface runoff through interception and the soaking up of water. Tree roots also help to improve infiltration by opening up the soil and slowing down the rate at which water reaches the ground;
Follow up links:
The following links provides further useful background on the Lynmouth Flood
Lynmouth Flood of 1952
Exmoor National Park - the Lynmouth Flood
2002 Memorial for the Lynmouth Disaster
Rain Making link to killer floods - an interesting twist in the tale which some people have said could explain the higher than usual levels of rainfall!

Source of Photographs www.geographyphotos.com / A Lawson

Friday, November 17, 2006

Hydrographs and River Discharge

What are Hydrographs?

The amount of water in a river at any given point and time is known as the discharge which is measured in cumecs (cubic metres per second). This can be calculated by multiplying river velocity by channel volume at a given point and time.


Hydrographs are graphs which show river discharge over a given period of time and show the response of a drainage basin and its river to a period of rainfall.


A storm hydrograph shows how a river's discharge responds following a period of heavy rainfall. On a hydrograph, the flood is shown as a peak above the base (normal) flow of the river. Analysis of hydrographs can help hydrologists to predict the likelihood of flooding in a drainage basin. The response of a river to a rainfall event can be measured in terms of the lag time - the time between peak rainfall and peak discharge. Rivers with a short lag time respond rapidly to rainfall events and are therefore more prone to flooding than rivers with a longer lag time

River discharge does not respond immediately to rainfall inputs as only a little of the rainfall will fall directly into the channel. The river will start to respond initially through inputs from surface runoff (the fastest flow of water) and its discharge will later be supplemented through inputs from throughflow and groundwater flow.


Variations in the shape of a Hydrograph:

The shape of a hydrograph is determined by the speed in which flood waters are able to reach the river. The nature of the drainage basin therefore has a great influence on the way a river responds to a river as it will determine the types and speeds of the flow of water to the river.

The fastest route to the river is via overland flow. If most of the water in a drainage basin travels in this way, a river will respond quickly to heavy rainfall and the hydrograph shape will be 'peaky' (graph A) with steep rising and recessional limbs. The lag time will be short and there will be a greater risk of flooding. Where more water is able to pass into the soil and travel to the river via throughflow / groundwater flow, there will be a slower rise in discharge and the river will respond slower (graph B). The lag time will be longer and the risk of flooding will be much lower.


Factors affecting a flood hydrograph:

Characteristics of the Drainage Basin:
  • - impermeable rocks (e.g. granite) and soil (e.g. clay) will not allow water to pass through, resulting in large amounts of surface runoff and a greater flood risk as rivers respond quickly - results in a short lag time.
  • - permeable rocks and soil have a high infiltration capacity and will absorb water quickly, reducing overland flow - results in a longer lag time
  • - a drainage basin with a steep gradient will result in greater overland flow and a shorter lag time than where the gradient is less steep allowing more time for infiltration to occur.

Type and amount of Precipitation:
  • - heavy rain results in rapid saturation of the upper soil layers and the excess water therefore reaches streams quickly as surface runoff (short lag time)
  • - slow light rain can be absorbed by infiltration and the river takes longer to respond to rainfall as water takes longer to pass through the drainage basin via throughflow and groundwater flow (longer lag time)

Land Use and Human Impact
  • - impermeable man made surfaces such as concrete and tarmac are impermeable therefore rivers in urban drainage basins tend to have short lag times due to higher amounts of surface runoff and drainage systems taking water to rivers quickly.
  • - vegetated areas help to reduce flood risk by increasing the time it takes for water to reach a river (longer lag time) by encouraging infiltration (roots opening up the soil), intercepting water by their leaves and taking up water in their roots.
  • - areas cleared by deforestation will respond quickly to rainfall due to the reduced interception
Size of the Drainage Basin
  • - Large Drainage Basin - water will take longer to reach the river (long lag time)
  • - Small Drainage Basin - water will enter the river quicker (short lag time)
Present conditions of the Drainage Basin
  • - If the soil has already been saturated by heavy rain its infiltration capacity will be reduced and further rain will go as surface runoff
  • - If the soil is dry it will be able to absorb more water during infiltration and therefore the lag time will be longer
  • - if the ground surface is frozen lag time is short as water cannot infiltrates and passes quickly to the river as runoff

River Management
  • - the presence of a dam will allow flow to be controlled, reducing flood risk and allowing rivers to gradually respond to heavy rainfall in a controlled way;
Now check your understanding of the factors affecting lag time - by playing this lag time quiz - sort out the factors you are given into whether they would result in a long or short lag time - see how quickly you can sort them accurately!


Follow up links:
Try out this fantastic interactive module on hydrographs and flooding - learn about how discharge is calculated and watch the animated development of a hydrograph during a virtual rainfall event. Make sure you also try out the flood model - change the land-use in the virtual drainage basin and watch what happens to the rivers discharge and associated hydrograph when you 'flood' the basin!

GCSE Bitesize Revision - Flood hydrographs

Here is a fantastic powerpoint to remind you of how hydrographs are constructed and the factors that affect them - great for revision! Many thanks to Ollie Bray of Mussleburgh Grammar School for sharing this! (If you do not have powerpoint on your computer you can download a free powerpoint viewer here which will then let you view the file)


Revision / Exam Tips:
  1. make sure you are able to calculate lag time - you may be given a hydrograph in an exam and be expected to give the lag time
  2. when quoting lag time, discharge, rainfall etc.. from a hydrograph make sure you include the relevant units in your answer! (i.e. hours, cumecs, mm etc.)
  3. make sure you are able to discuss the factors that result in long or short lag times and thus affect the likelihood of a drainage basin flooding.


Key Terms Check:

Discharge - this is the amount of water in a river at any given point and time. Discharge is measured in cumecs (cubic metres per second)

Velocity - speed of a river (measured in metres per second)

Hydrograph - a graph showing changes in river discharge over time in response to a rainfall event.

Lag time - the time taken between peak rainfall and peak discharge

Rising Limb - shows the increase in discharge on a hydrograph

Falling Limb - shows the return of discharge to normal / base flow on a hydrograph

Peak Rainfall - maximum rainfall (mm)

Peak Discharge - maximum discharge (cumecs)

Sunday, November 12, 2006

Lower Course of the River - Floodplains and Levées

Moving between the Middle and Lower Course of the River


As a river continues its journey towards the sea, the valley cross section continues to become wider and flatter with an extensive floodplain either side of the channel. The river erodes laterally and deposition also becomes important. By the time it reaches the lower course the river is wider and deeper and may contain a large amount of suspended sediment.

When the river floods over the surrounding land it loses energy and deposition of its suspended load occurs. Regular flooding results in the building up of layers of nutrient rich alluvium which forms a flat and fertile floodplain.

When the river water bursts its bank, the shallower depth of water flowing over the surface results in frictional drag and a consequent reduction in velocity (speed) of flow. This results in the loss of energy and therefore deposition occurs. The heaviest materials are deposited first as these require the most energy to be transported and therefore build up around the sides of the river forming raised banks known as Levées (click on diagram above). Finer material such as silt and fine clays continuing to flow further over the floodplain before they are deposited.

Find out more:
See these Wikipedia articles on floodplains and on natural and artificial levées This article called "Raising the Bar for Levees" looks at the role of Levees in flood protection an idea we will come back to in a few lessons time when we look at the causes, effects and management of river floods.

Visualising Floodplain and Levée formation
A nice animation showing the development of a floodplain and Levées Floodplain animation

Key Term Check

Floodplain - the area of land around a river channel which is formed during times of flood when the amount of water in a river exceeds its channel capacity and deposition of rich silt occurs.

Levées - a raised river bank (can be natural features formed by deposition or artificial structures built to increase channel capacity and reduce flood risk)

Saturday, November 11, 2006

Middle Course of the River - Meanders & Ox-bow Lakes

The Middle Course of a River
Having studied the characteristics of a river in its upper reaches we now need to follow the river as it enters its middle course. Here the river channel has become much wider and deeper as the channel has been eroded and the river has been fed by many tributaries upstream. Consequently, despite the more gentle gradient the velocity of flow may be as fast as in the uplands. As well as changes in the river channel, its surrounding valley has also become wider and flatter in cross-section with a more extensive floodplain. One of the most distinctive features of the river in the middle course is its increased sinuousity. Unlike the relatively straight channel of the upper course, in the middle course there are many meanders (bends) in the river.


Meander Formation

Meanders form due to the greater volume of water carried by the river in lowland areas which results in lateral (sideways) erosion being more dominant than vertical erosion, causing the channel to cut into its banks forming meanders.


1. Water flows fastest on the outer bend of the river where the channel is deeper and there is less friction. This is due to water being flung towards the outer bend as it flows around the meander, this causes greater erosion which deepens the channel, in turn the reduction in friction and increase in energy results in greater erosion. This lateral erosion results in undercutting of the river bank and the formation of a steep sided river cliff.

2. In contrast, on the inner bend water is slow flowing, due to it being a low energy zone, deposition occurs resulting in a shallower channel. This increased friction further reduces the velocity (thus further reducing energy), encouraging further deposition. Over time a small beach of material builds up on the inner bend; this is called a slip-off slope.

Remember - a meander is asymmetrical in cross-section (see diagram). It is deeper on the outer bend (due to greater erosion) and shallower on the inside bend (an area of deposition).


Over time meanders gradually change shape and migrate across the floodplain. As they do so meander bends becomes pronounced due to further lateral erosion and eventually an ox-bow lake may form.

Ox-Bow Lake formation


  1. As the outer banks of a meander continue to be eroded through processes such as hydraulic action the neck of the meander becomes narrow and narrower.
  2. Eventually due to the narrowing of the neck, the two outer bends meet and the river cuts through the neck of the meander. The water now takes its shortest route rather than flowing around the bend.
  3. Deposition gradually seals off the old meander bend forming a new straighter river channel.
  4. Due to deposition the old meander bend is left isolated from the main channel as an ox-bow lake.
  5. Over time this feature may fill up with sediment and may gradually dry up (except for periods of heavy rain). When the water dries up, the feature left behind is knwon as a meander scar.
Visualising Meander formation:
Key Terms Check:
  • Meander - a bend in a river
  • River Cliff - a small cliff formed on the outside of a meander bend due to erosion in this high energy zone.
  • Slip off Slope - a small beach found on the inside of a meander bend where deposition has occured in the low energy zone.
  • Ox-bow lake - a lake formed when the continued narrowing of a meander neck results in the eventual cut through of the neck as two outer bends join. This result in the straightening of the river channel and the old meander bend becomes cut off forming an ox-bow lake.
  • Meander scar - feature left behind when the water in an ox-bow lake dries up.

Natural World - Iguacu Falls


Natural World on Wednesday 15th November at 8.00pm on BBC 2 looks at the stunning Iguacu falls on the Brazil/Argentina border. This waterfall is 3 times wider than the Niagara Falls and is surrounded by rainforest.

Photographs from Wikipedia Creative Commons (Share Alike Licence) http://commons.wikimedia.org/wiki/Image:Iguacu-001.jpg#file http://commons.wikimedia.org/wiki/Image:Iguacu-003.jpg Author: Reinhard Jahn, Mannheim

Friday, November 10, 2006

Upper Course of the River: Waterfalls

An other feature found in the upper course of a river, where vertical erosion is dominant, is a waterfall. The highest waterfall in the world is the Angel Falls in Venezuela (see picture right) which have a drop of 979m. Other particularly famous examples include Niagara Falls (North America), the Victoria Falls (on the Zambia / Zimbabwe border) and the Iguazu Falls (South America).


Although much smaller in scale, there are many waterfalls in the upper course of UK rivers (e.g. Thornton Falls, Yorkshire - above), but how do they form?


The formation of Waterfalls


1.Waterfalls are found in the upper course of a river. They usually occur where a band of hard rock lies next to soft rock. They may often start as rapids.

2. As the river passes over the hard rock, the soft rock below is eroded (worn away) more quickly than the hard rock leaving the hard rock elevated above the stream bed below.

3. The 'step' in the river bed continues to develop as the river flows over the hard rock step (Cap Rock) as a vertical drop.

4. The drop gets steeper as the river erodes the soft rock beneath by processes such as abrasion and hydraulic action. A plunge pool forms at the base of the waterfall.


5. This erosion gradually undercuts the hard rock and the plunge pool gets bigger due to further hydraulic action and abrasion.Eventually the hard cap rock is unsupported and collapses. The rocks that fall into the plunge pool will continue to enlarge it by abrasion as they are swirled around. A steep sided valley known as a gorge is left behind and as the process continues the waterfall gradually retreats upstream.


Visualising Waterfall Formation:

The labelled diagram of a cross section through a waterfall below, shows the formation process (click on diagram for a larger version).
There are also number of excellent animations on the internet which can help you visualise how a waterfall forms. Try out the following:

1. A good step by step animation of waterfall formation showing all the main stages involved (Wycombe High School)
2. This simple but excellent animation showing an aerial view of waterfall formation clearly shows the development of a gorge as the waterfall retreats upstream! (Cleonet)
3. An animation of waterfall formation from a different 3-dimensional perspective. Look carefully at how the plunge pool is enlarged during the formation process. (Classzone)


Key Term Check:

  • Cap Rock - layer of hard resistant rock forming the 'step' over which the 'falls' occur in a waterfall.

  • Waterfall - a cascade of water over a hard rock step in the upper course of a river

  • Plunge Pool - a deep pool beneath

  • Gorge - a steep sided valley left behind as a waterfall retreats upstream

  • Abrasion - where rocks and boulders scrape away at the river bed and banks

  • Hydraulic Action - where the force of water compresses air in cracks resulting in mini-explosions as the increased pressure in the cracks is then released.

Upper Course of the River: V-Shaped Valleys

V-Shaped Valleys

In the upper course of a river, water flows quickly through a narrow channel with a steep gradient; as it does so it cuts downwards. This vertical erosion results in a number of distinctive landforms including the steep sloping v-shaped valley through which the river flows in its upper course.


So how does a v-shaped valley form?

1. Vertical erosion (in the form of abrasion, hydraulic action and solution) in the river channel results in the formation of a steep sided valley
2. Over time the sides of this valley are weakened by weathering processes and continued vertical erosion at the base of the valley
3. Gradually mass movement of materials occurs down the valley sides, gradually creating the distinctive v-shape.
4. This material is then gradually transported away by the river when there is enough energy to do so.

As the river flows through the valley it is forced to swing from side to side around more resistant rock outcrops (spurs). As there is little energy for lateral erosion, the river continues to cut down vertically flowing between spurs of higher land creating interlocking spurs.

Visualising V-shaped Valley Formation


Key Term Check
V-shaped Valley - a valley which resembles a 'v' in cross section. These valleys have steep sloping sides and narrow bottoms.

Interlocking Spur - spurs are ridges of more resistant rock around which a river is forced to wind as it passes downstream in the upper course. Interlocking spurs form where the river is forced to swing from side to side around these more resistant ridges.

Load
- collective term for the material carried by a river

Click on the diagram above to see a larger version.

River Processes

As a river flows along its course it undertakes 3 main processes which together help to shape the river channel and the surrounding valley. These processes are erosion, transport and deposition.

RIVER EROSION
River erosion is the wearing away of the land as the water flows past the bed and banks. There are four main types of river erosion. These are:

  1. Attrition - occurs as rocks bang against each other gradually breaking each other down (rocks become smaller and less angular as attrition occurs)
  2. Abrasion - this is the scraping away of the bed and banks by material transported by the river
  3. Solution - chemicals in the river dissolve minerals in the rocks in the bed and bank, carrying them away in solution.
  4. Hydraulic Action - this is where the water in the river compresses air in cracks in the bed and banks. This results in increased pressure caused by the compression of air, mini 'explosions' are caused as the pressure is then released gradually forcing apart parts of the bed and banks.
Here is a great little animation by a teacher from Somerset (Noel Jenkins) showing the main processes of river erosion - make sure you learn them!

RIVER TRANSPORT
Material may be transported by a river in four main ways: solution, suspension, saltation and traction (see diagram). The type of transport taking place depends on (i) the size of the sediment and (ii) the amount of energy that is available to undertake the transport. In the upper course of the river there is more traction and saltation going on due to the large size of the bedload, as a river enters its middle and lower course there is alot of finer material eroded from further upstream which will be carred in suspension. Here is a great little movie showing the process of saltation.

Check out the following animation showing the processes of river transport

DEPOSITION
Deposition is where material carried by the river is dropped. This will occur when there is no longer sufficient energy to transport material. Deposition of material may result in the formation of distinctive features such as slip off slopes (on the inner bends of meanders); levees (raised banks) and of course the floodplain itself. Remember - it is the largest material that will be dropped first as it requires the most energy to be transported. eroded from further upstream which will be carried in suspension.

This animation looks at sediment deposition as a river enters a lake - look at what size material is deposited first.

Now test your understanding:
Try out these drag and drop games to match up the key processes of erosion and transport with their correct definitions.

Rivers - Source to Mouth

Having understood the basics of a Drainage Basin we now need to consider the journey that a river within a Drainage Basin takes from its beginning to its end. The path the river follows from its source to mouth is known as the river's course. When studying rivers we often divide it into 3 main sections, the upper course; middle course and lower course. Each part of the river has distinctive features which form and the characteristics of the river and its surrounding valley change downstream (click on the diagram to see the main changes)

The photographs on this site show some examples of how the landscape changes along the course of a river.


The Drainage Basin

The land based part of the hydrological cycle is called the Drainage Basin System. A drainage basin is the name given to the area of land which is drained by a river. When water reaches the surface there are a number of routes which it may take in its journey to reach the river. These are shown in the diagram opposite.


Drainage Basins have a number of distinct features which you need to be able to name and identify. The edge of a drainage basin is characterised by the highest points of land around the river, this is known as the watershed. The point at which a river starts is called its source. As the river continues to flow down stream it may be joined by smaller rivers called tributaries. The point at which these smaller rivers join the main river is known as a confluence. As the river continues its journey, eventually reaches the sea - the point where the river flows into the sea is known as the river mouth.

Finding out more.....

Check out this great animation on watersheds

In a few lessons time we will be starting to think about the characteristics of different drainage basins and how these can affect the pathways water takes and how quickly water that falls as precipitation reaches the river. Start thinking about this by reading this article on Drainage Basin.

Now Check your understanding...

Try out this Hydrological Cycle / Drainage Basins Walk the Plank Game
and check your understanding of Drainage Basin Features by matching up these key terms and definitions within the 30 second time limit!

Monday, October 30, 2006

The Hydrological Cycle


For the first part of this unit you need to ensure that you have a good understanding of the Hydrological Cycle which represents the movement of water between the land, air and sea. The hydrological cycle is a closed system with a fixed amount of water, however this water may be in one of 3 states, liquid, gas or solid (ice) and although it may be moving it may also be in storage. Make sure you understand the hydrological cycle diagram and all its inputs, stores and transfers.
1. Evapotranspiration; 2. Condensation;
3. Precipitation; 4. Infiltration; 5. Throughflow; 6. Runoff; 7. Groundwater flow and 8. Evaporation

Now test yourself by having a go at the following Hydrological Cycle Quiz - simply drag and drop the key words into the correct position on the diagram.

Now check your understanding:

Try testing yourself on the different processes using these Hydrological Cycle Flash Cards
Now try this multiple choice quiz to test yourself.

Here are a couple of fun quizzes to also check your understanding of the key terms:
1. Hydrological Cycle Penalty Shootout (why not try the 2 player game against a friend!)
2. Hydrological Cycle Multiple Choice Key Terms Quiz

Welcome Back!

Welcome back - hope you all had a good half term. Congratulations on a good set of results in your end of unit coasts tests. Do look through your answers and see where you lost marks - do come and see me if you want to chat through any areas you are still unsure on. We are starting this half term on our next topic which is Rivers and their Drainage Basins!

Wednesday, October 11, 2006

Coasts Test - Good Luck!

Remember - the end of unit test for Cb's class is tomorrow - make sure you have revised your notes thoroughly and in particular that you have learnt your case studies. A few hints for you:

  • make good use of labelled diagrams - can you draw labelled sketches to help you draw the main erosion / deposition features?
  • remember to learn the processes that take place at the coast and if explaining the formation of a coastal feature talk about the processes which have resulted in its formation!
Good luck!

Monday, October 09, 2006

Revising the Coasts Unit

We have now come to the end of the Coasts unit, but before we move on you will have an end of unit test - to help with your revision visit the coasts revision resources on GeoBytes. There are summary notes, quizzes and even podcasts!

Coasts Revision Resources

Welcome to GCSE@GeoBytes!


Welcome to GCSE@GeoBytes a brand new blog designed especially for you! This blog is to support students studying the OCR 'A' Geography GCSE course at St Ivo.